

Using SDK
Tokenization is the process of replacing a sensitive card number with a unique, randomly generated token. This token can be used for transactions without exposing the actual card details, reducing the risk of fraud and data breaches. The real card information is securely stored by a tokenization provider, ensuring that merchants and payment processors handle only the token instead of the original card data.
To begin the tokenization process it is necessary to create a customer from the backend of your application.
curl --location 'https://sandbox.ecartpay.com/api/customers' \
--header 'Authorization: {{token}}' \
--header 'Content-Type: application/json' \
--header 'Cookie: lang=en' \
--data-raw '{
   "first_name": "Pepillo",
   "last_name": "Maganda",
   "email": "[email protected]",
   "phone": "4775619371"
}'
Once the customer has been created, you can store the response ID in your database to later initialize the SDK. You will need to create a customer session. It is important to remember that these steps must be carried out from the back of your application.
curl --location --request POST 'https://sandbox.ecartpay.com/api/customers/{{customer_id}}/session' \
--header 'Authorization:{{token}}' \
--header 'Cookie: lang=en'
The session identifier that our API returns will be necessary so that you can initialize the form where the card data will be captured, below we will show you an example.
<!DOCTYPE html>
<html lang="es">
<head>
    <meta charset="UTF-8">
    <meta name="viewport" content="width=device-width, initial-scale=1.0">
    <title>My Cards</title>
    <style>
        body {
            font-family: Arial, sans-serif;
            text-align: center;
            margin-top: 50px;
        }
        button {
            background-color: #007bff;
            color: white;
            border: none;
            padding: 10px 20px;
            font-size: 16px;
            cursor: pointer;
            border-radius: 5px;
        }
        button:hover {
            background-color: #0056b3;
        }
    </style>
</head>
<body>
    <button id="my-button">My Cards</button>
    <script src="https://sandbox.ecartpay.com/sdk/pay.js"></script>
    <script>
        document.getElementById('my-button').addEventListener('click',() => {
            let ecartpay = Pay.Cards.render({});
	          ecartpay.on('cards:save', (event) => {
                console.log(event); // Save the card ID in your server
            });
            let session = // Create the session from your server
            ecartpay.session(session);
            ecartpay.start();
        });
    </script>
</body>
</html>
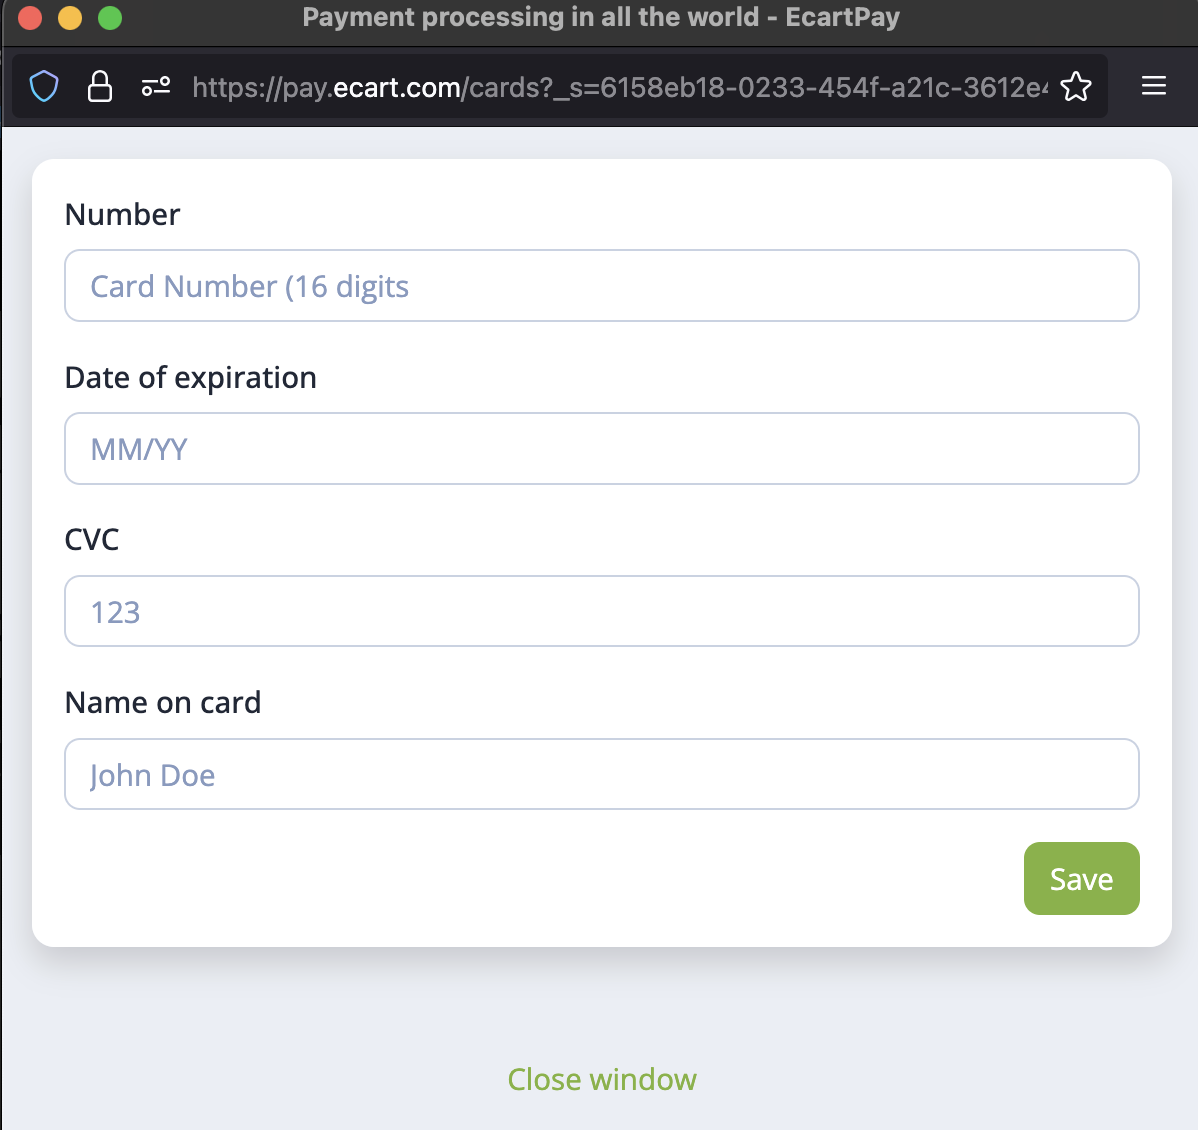
When you execute the start function, you should be able to see a view like the one shown in the following image:
When your client has entered and saved the card data, you will receive an event from the popup to the parent window called cards:save, you can review the previous HTML example.
Now you can continue with the tokenization process using the service we have available, the API will respond with a token that you can use to make recurring charges.
curl --location 'https://sandbox.ecartpay.com/api/tokens' \
--header 'Authorization: eyJhbGciOiJIUzUxMiIsInR5cCI6IkpXVCJ9.eyJpZCI6IjYxODA0ODNiZWFiOWQ5NDVhODZkYTNjMSIsImFjY291bnRfaWQiOiI1ZmFiM2IyMGI0MGIwYTYxM2UxYjZmMTUiLCJpYXQiOjE3NDA2MjQxNDUsImV4cCI6MTc0MDYyNzc0NX0.RzLfkFU3FiNQd-UMonp5VDqNJQawopkU8oi2Jtk2UX2S3WXyxqZCSQPS3xVj5QdeMXEf--4dcwBe8ERA6h6s8Q' \
--header 'Content-Type: application/json' \
--header 'Cookie: lang=en' \
--data '{
    "id": "65bac7e21bb14b22bfb78533",
    "tokenization": true
}'